


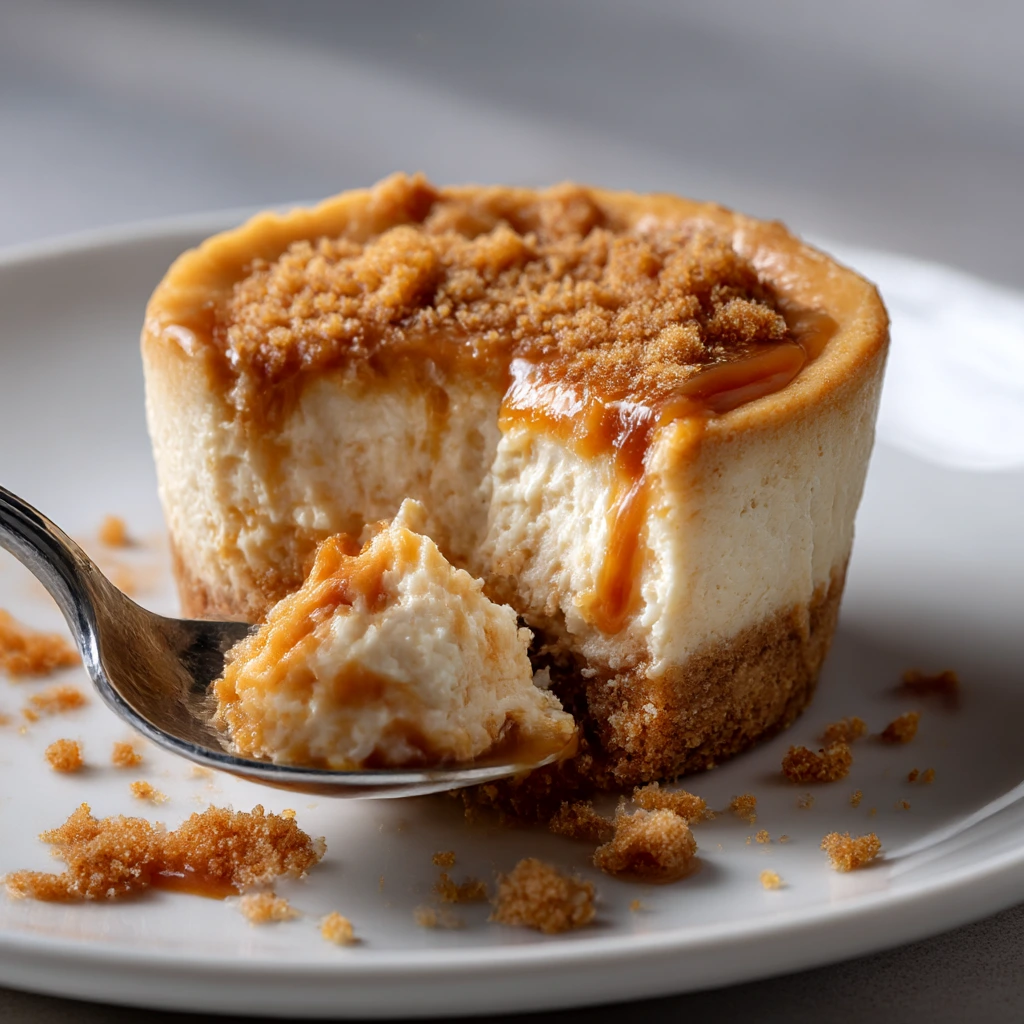
These cups are what I make when I want cheesecake, but I don’t want to bake it in the oven. You press a quick cookie crust into cups, make a fluffy cream cheese filling, then add salted caramel where it actually shows up as a layer. It’s rich, but the salt softens the too-sweet taste.
If you’ve ever ended up with runny no-bake cheesecake, it’s usually the cream. Whip it until it’s thick and holds, then fold it in and stop as soon as the filling looks smooth. Also, don’t pour warm caramel into the cups. Chill them overnight if you can, and you’ll get that firm, creamy “cheesecake spoonful” instead of a soft mousse.
What you’re making
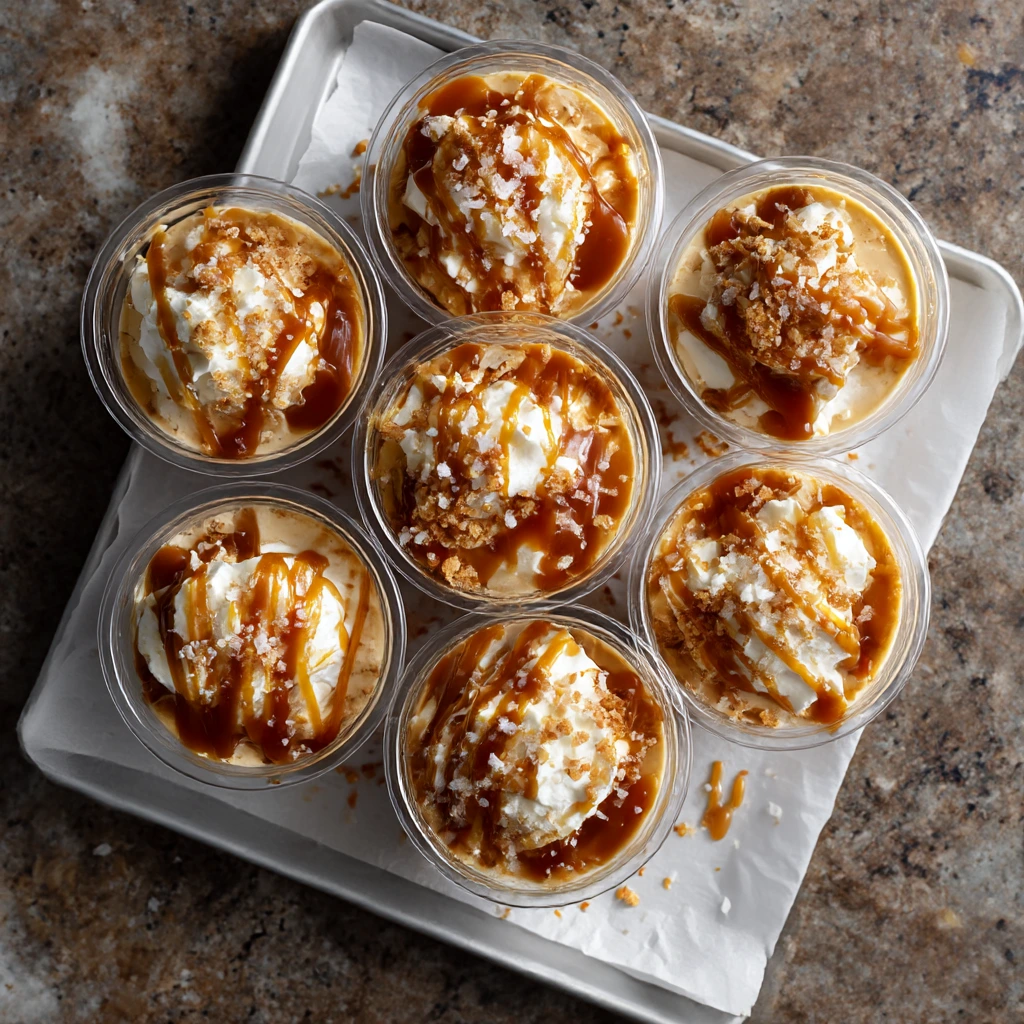
These no-bake salted caramel cheesecake cups are layered desserts in little cups or jars. You press in a cookie crust, add a thick cheesecake filling, and spoon in salted caramel so you get it in every bite. Then the fridge sets everything.
Why these set well (and don’t turn runny)
No-bake cheesecake usually turns soft for two reasons. The cream wasn’t whipped enough, or the filling get mixed too long after the cream went in. I’ll walk you through what to look for, so you stop at the right moment.
When to make them
These are easiest when you make them ahead. The chill time does more than “set” them. It also sharpens the layers and helps the crust hold together when you scoop.
Quick Recipe Snapshot
Prep and chill time
Plan on about 20 minutes of hands-on work. Chill at least 4 hours. Overnight gives you the cleanest scoop.
The texture goal
You want a filling that feels creamy and light, but still holds. When you scoop it, it should sit on the spoon. It shouldn’t slide off.
The one thing that makes or breaks it
Stiff peaks. If your whipped cream looks soft, the cups will set softer. If the peaks stand up, the filling holds.
Best caramel consistency
Use caramel sauce that’s thick and drizzleable. Don’t use it hot. Thin caramel sinks. Warm caramel melts layers. Cool and pourable is the sweet spot.
Why You’ll Love These Cheesecake Cups
What makes them worth keeping in rotation
No oven, no guessing
You don’t bake anything, so you skip cracks and timing stress. You build the texture, then let the fridge finish it.
Easy to serve
Cups mean no slicing and no messy edges. They also travel better than a whole cheesecake.
Sweet-salty balance
Salted caramel adds depth. A tiny pinch of flaky salt on top keeps the bite from tasting flat or too sweet.
What These Cheesecake Cups Taste Like
Flavor and texture, layer by layer
The crust
Buttery and crisp. When you pack it firmly, it stays crunchy instead of turning sandy.
The cheesecake layer
Smooth and fluffy. Not heavy. The whipped cream lifts the texture, so it feels light but still rich.
The caramel
Rich, silky, and slightly salty. With a thicker caramel sauce, you get a real layer instead of a smear.
Ingredients That Matter Most
What makes the difference between “okay” and “great”
Cream cheese (block style if you can)
Block cream cheese gives the most stable set. Tub cream cheese is softer, so the cups can end up looser. Also, soften it before you mix. Cold cream cheese is where lumps start.
Heavy cream (cold)
Cold cream whips faster and holds better. If your kitchen is warm, chill the bowl for 10 minutes. That helps you reach stiff peaks without overworking it.
Caramel sauce (not syrup)
Caramel sauce stays in a layer. Syrup tends to soak in and vanish. If your sauce is very thick, warm it for a few seconds, stir, then let it cool back down.
Flaky sea salt
Use a light pinch on top. This is a finish. You want contrast, not a salty bite.
Caramel Options and How to Choose
Store-bought vs homemade
Store-bought caramel (fast and totally fine)
Look for a thick caramel sauce. If it pours like pancake syrup, it usually won’t layer well. If it’s too thick to drizzle, warm it 5–10 seconds, stir, then wait a minute so it’s not hot.
Homemade caramel (best flavor)
Homemade salted caramel tastes deeper, especially if it’s cooked a little darker. Let it cool before it touches the filling. Warm caramel is the quickest way to blur layers.
Step-by-Step Method
The method, with the cues that matter
Quick tool note
A hand mixer makes this easier. A piping bag helps with clean layers, but a zip-top bag works. Clear cups look nice, but any small cup works.
Step 1 — Build and set the crust
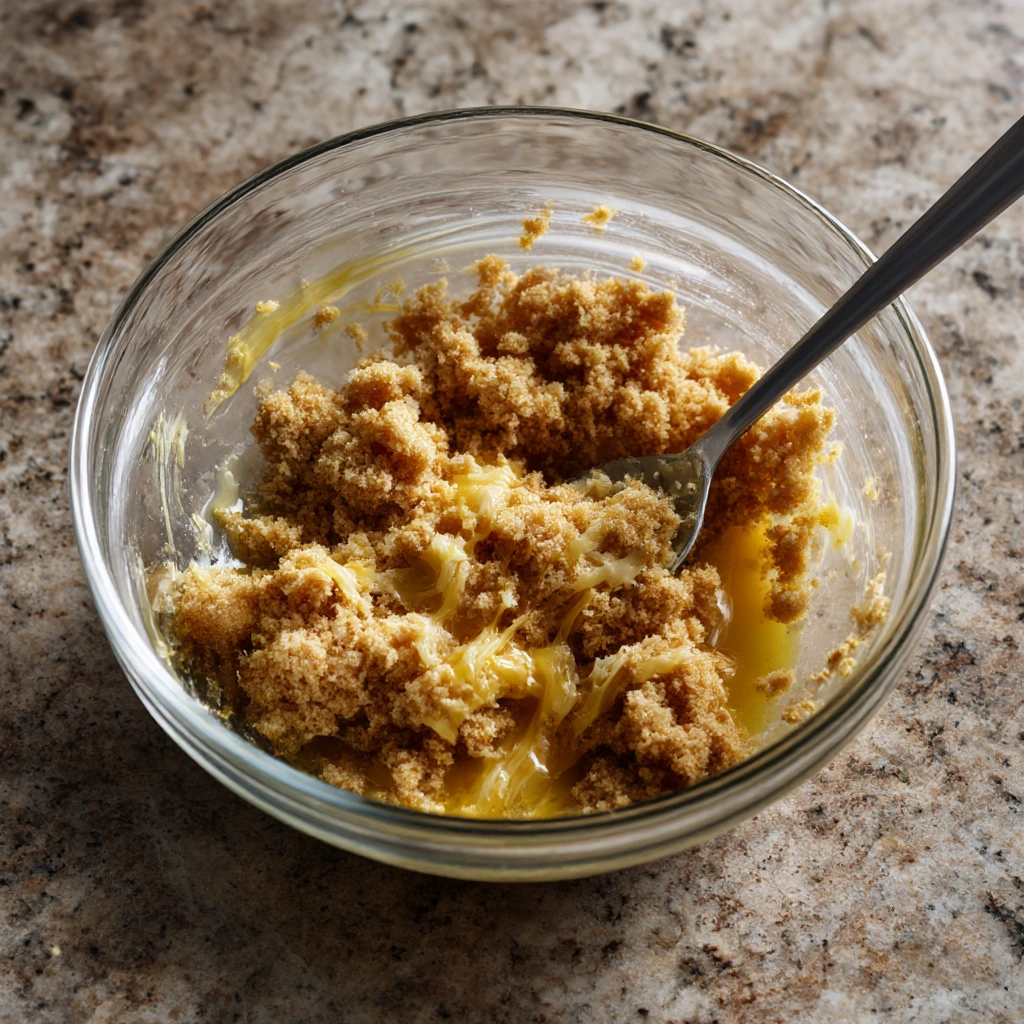
Mix cookie crumbs with melted butter until it is kind wet. Like sandy wet. Squeeze a handful. It should hold together. Press it firmly into each cup. Press harder than you think. Chill the crust while you make the filling. That helps it stay together later.
Step 2 — Whip the cream to stiff peaks
Whip cold heavy cream until the peaks stand up and hold. If you lift the beaters, the peak should stay pointed. Quick cue: tip the bowl slightly. The cream should stay put, not slide. If it looks soft, keep going.
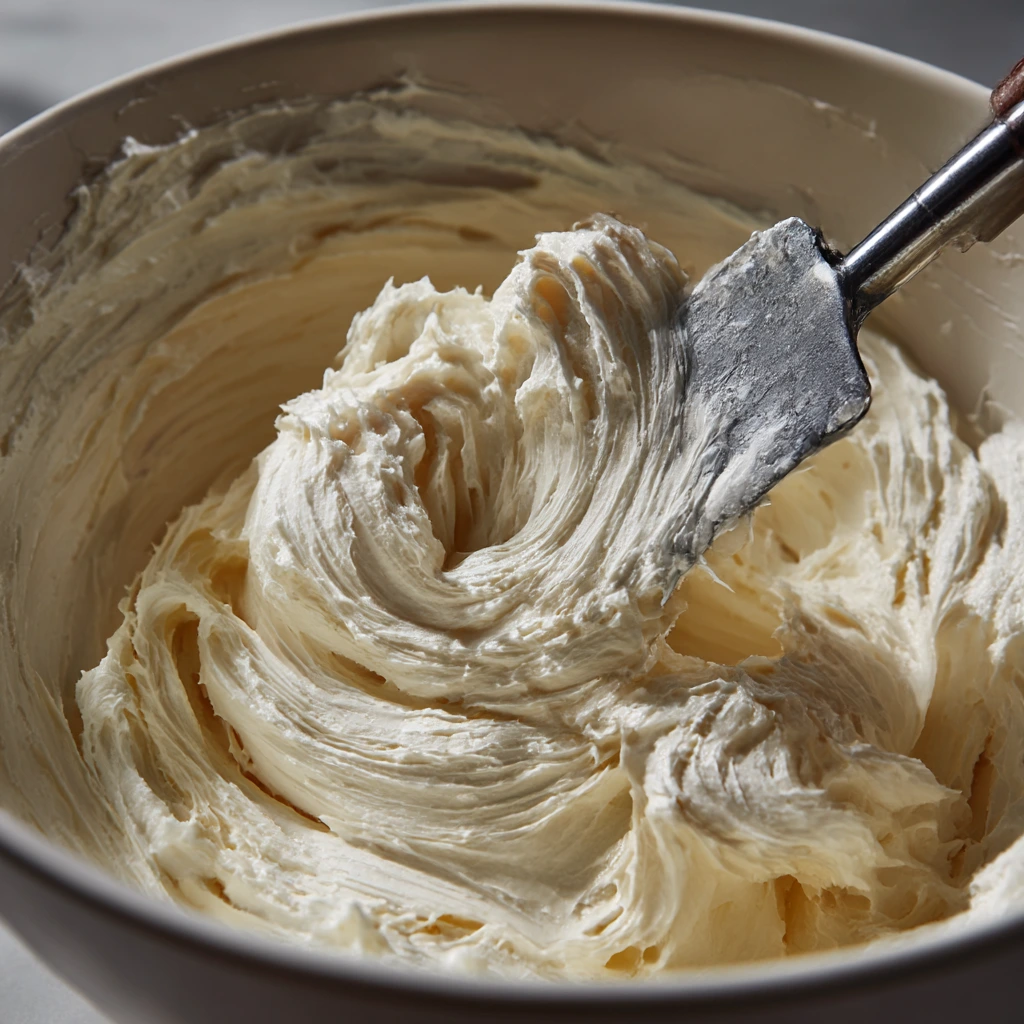
Step 3 — Smooth the cream cheese base first
Beat the softened cream cheese until it looks fully smooth. Do this before you add sugar. Once it’s smooth, mix in your sweetener and vanilla. Taste it. Keep it lightly sweet. The caramel will add more sweetness later.
Step 4 — Fold gently and stop early
Fold the whipped cream into the cream cheese mixture in two additions. Use a spatula. Fold until it looks even, then stop. If you keep mixing after it’s smooth, the filling loosens.
Step 5 — Layer with cool caramel
Layer crust → cheesecake → caramel → cheesecake. Keep the caramel cool so it stays in a stripe. If you want sharper layers, chill the cups 10–15 minutes after the first cheesecake layer, then add caramel, then finish the top layer.
Step 6 — Chill until set
Chill at least 4 hours. Overnight is best. The set test is simple: scoop a spoonful. It should hold its shape on the spoon.
Troubleshooting and Fixes
What’s happening and what to do
My filling looks soft after chilling
Many cups just need more time. If it’s still soft after you waitted, your whipped cream may have been under-whipped, or the filling got overmixed after folding. Next time, push the cream to stiff peaks and stop mixing sooner. Also note: tub cream cheese sets softer than block cream cheese.
My filling is lumpy
That usually means the cream cheese was too cold. Beat the cream cheese alone until smooth before adding sugar. If you already mixed it and see lumps, let it sit 5 minutes, then beat briefly again. Sometimes it relaxes.
My crust crumbles
This is almost always a packing issue. Press it down firmly and chill it before filling. If your crumbs are very dry, a touch more butter helps next time.
My caramel disappears
Caramel is too thin, too warm, or both. Use a thicker sauce and let it cool before layering. You can also do the quick chill between layers to lock things in place.
It tastes too sweet or too salty
Too sweet: Use less caramel in the middle and keep more of it as a top drizzle. A small splash of lemon juice in the filling can help balance the sweetness, too.
Too salty: skip extra flaky salt if your caramel already tastes salty. Or use a tiny pinch, not a full sprinkle.
Variations People Actually Make
Chocolate salted caramel cups
Add chocolate chips between layers, or a thin chocolate drizzle on top. Chocolate + caramel always works.
Biscoff version
Use Biscoff crumbs for the crust. Swirl a little cookie butter into the filling if you want it stronger.
Espresso caramel
Mix a little espresso powder into the filling for a coffee edge that pairs well with caramel.
Make-Ahead, Storage, and Serving
Make-ahead timing
These are best made 12–24 hours ahead. The cups set firmer, and the layers look cleaner.
Storage
Cover and refrigerate. They keep well for 3–4 days. If you plan to add whipped topping, add it close to serving so it stays neat.
Serving tips
Serve cold. Add the final caramel drizzle and flaky salt right before serving. If you’re traveling, keep the cups chilled and bring toppings separately.
FAQ
Quick answers to common questions
How long do no-bake cheesecake cups need to chill?
At least 4 hours. Overnight is best for clean layers and a firmer scoop.
Can I use Cool Whip instead of heavy cream?
Yes. Fold it in gently. Expect a sweeter flavor and a slightly softer set.
What size cups work best?
4–6 oz cups are ideal. Smaller feels lighter. 6 oz feels more generous.
Can I double the recipe?
Yes. Double everything. If your bowl is small, whip the cream in two batches so it reaches stiff peaks evenly.
Check This:
Caramel Recipe: Ultimate No-Fail Sauce You’ll Love


Best Easy No-Bake Salted Caramel Cheesecake Cups
Ingredients
Crust
- 1 1/2 cup cookie crumbs (graham cracker crumbs or Biscoff crumbs)
- 6 tbsp unsalted butter, melted
- 1 tbsp granulated sugar (optional, skip if using sweet cookies)
- Pinch of Salt
Cheesecake Filling
- 16 ounces block cream cheese, softened
- 1/2 cup powdered sugar
- 1 1/2 tsp vanilla extract
- 1 cup heavy whipping cream, cold
- 1 tbsp lemon juice (optional, helps balance sweetness)
Salted Caramel + Topping
- 1/2 to 3/4 cup salted caramel sauce, cool and thick (plus more for drizzling)
- Flaky sea salt, for topping (tiny pinch per cup)
Instructions
- Make the crust: In a bowl, mix cookie crumbs, melted butter, pinch of salt, and sugar (if using). The mixture should look like wet sand and hold together when you squeeze it. Divide into 8 cups and press firmly into the bottom of each cup. Chill while you make the filling.
- Whip the cream to stiff peaks: In a cold bowl, whip the heavy cream until stiff peaks form. When you lift the beaters, peaks should stand up. If you tip the bowl slightly, the cream should stay put.
- Make the cream cheese base: In a separate bowl, beat softened cream cheese until completely smooth. Add powdered sugar and vanilla (and lemon juice if using) and mix until smooth. Taste and adjust if needed.
- Fold in the whipped cream: Add whipped cream to the cream cheese mixture in two additions. Fold gently with a spatula until just combined and smooth. Stop as soon as it looks even. Do not overmix.
- Layer the cups: Spoon or pipe cheesecake filling over the chilled crust. Add a layer of cool caramel (about 1–2 teaspoons per cup, or to taste). Top with the remaining cheesecake filling. If you want sharper layers, chill 10–15 minutes after the first cheesecake layer before adding caramel.
- Chill until set: Cover and refrigerate at least 4 hours. Overnight is best for a firm set and clean layers.
- Finish and serve: Right before serving, drizzle with more caramel and add a tiny pinch of flaky sea salt on top. Serve cold.